Showing posts with label lighting102. Show all posts

Thursday, August 16, 2007

Puzzling it out

puzzling it outThe latest Strobist lighting102 assignment is to play with using the specular highlight as a background element, while lighting the foreground subject. You can see one of my early attempts here, with a strobe in a silver umbrella to the camera right and high up. I think this has worked out reasonably well, even with my confused look. The only real issue I can see is th shadow my bonce is casting into the specular highlight on the wood behind me. Next time I'll need to be a bit further from the background or change the flash angle slightly. This was relatively easy to set up - you can see the highlight through the lens if you trigger the flash while looking through the viewfinder, so it is possible to line things up pretty quickly, even if you are going to be the subject in the photo.

Saturday, August 11, 2007

Putting it all together: Cooking light

Nespresso
So enough of the boring test shots. This one is putting together some of the things I've learned so far, for the first Lighting102 Strobist assignment. The 'stage' is an upside down colander, with an sb-28 flash underneath, triggered with a pocket wizard. That shines the light up through the holes and hits the 'Nespresso' coffee capsule. This is a small orange capsule with a silver foil cap. I wanted to try to play the complimentary blue colour off the orange capsule to get some dynamic play between the colours and create some depth/ drama.
I first tried to colour the silver foil by reflecting a lit blue card, but I was getting a lot of reflections from the surface of the colander, giving a half silver, half blue result. Thinking about the angles a bit, I realised I needed to lift the capsule a bit, so I put some putty underneath, on the other side from the camera to raise the angle slightly. I then switched to using a Canon 580EX speedlight with a blue gel and a grid spot to focus the light onto the foil at a very low (1/128th) power. This coloured it up but didn't cast too much glare in to the lens. That's pretty much all there is to this - the lighting is on two distinct planes so the colours don't mix and I could vary the power of each independently.
I'd just been reading 'Light Science & Magic' and that explained a lot about how to achieve this, with discussion on the families of angles and lighting surfaces independently. Best of all, this got picked as one of the 'standout' entries for the assignment.

Wednesday, August 08, 2007

Lighting: specular highlights

Lit from aboveThis time around 
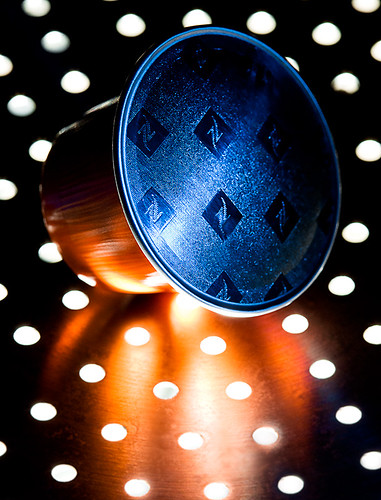
I'm playing with controlling the specular highlights that appear on the subject. The specular highlight is the reflection of the actual light source, bouncing off whatever it is you are lighting - in this case it is the white glare or sheen you can see on the pepper mill and also the white reflection on the metal top. Some subjects (such as metal) really only show specular highlights and no diffuse reflections, other's like wood, show a mix of specular and diffuse highlights. These properties of the materials can be used to control the lighting in a variety of interesting ways. I'm also using some of the other tricks from previous lessons to control diffusion and fall off, along with playing with the location and size of the specular highlight. 
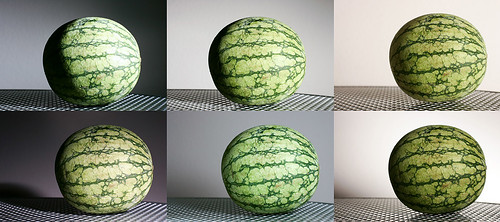
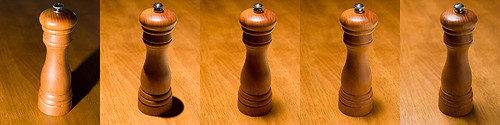
From left to right, the shots are: (1) Bare flash to camera left, at the same height as the pepper mill, about a 45 degree angle. Nasty light, harsh dark shadow, bright, narrow specular highlight the length of the mill because the light source is small and non-diffuse. To try and improve the situation (2) I moved the light source to almost directly overhead, but still slightly to the left to give some direction. You can tell this by where the shadow falls on the pepper mill. Now the table is better lit but the shadows are still harsh. The specular highlight has moved to the curved edge of the top of the pepper mill, as this is the direct reflection of the light. There's no specular highlight visible from the table, as the angle of the light, camera and table means it isn't visible. In shot (3) I've added a diffuser between the flash and subject. The specular highlight has gotten a bit bigger, as it is now reflecting the diffuser. The shadow edges have softened, both on the table and along the edge of the mill. In shot (4) I added a small white reflector to the right of the camera to bounce some light back in to fill the shadows. This doesn't change the specular highlight from the light source, but adds a new specular highlight on the right, which is the reflection of this new light 'source' - the bounce card. You can see that new highlight particularly in the metal top of the mill. In the final shot (5) I changed the light source from a diffused flash to a flash bounced into a silver umbrella. You can see that the specular highlight has become larger again, reflecting (literally!) the change in size of the light source.
Side highlight
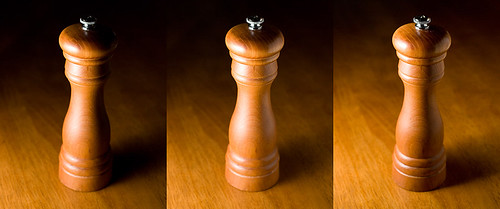
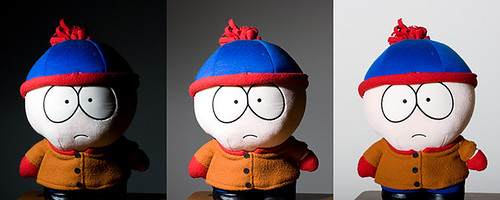
In this sequence, I've gone back to the original light position, at the same level as the object, at about 45 degrees to the camera access. The goal this time was to create a specular highlight that ran the height of the mill. I brought the light in closer to get more fall-off on the background and diffused it to control how harsh the specular highlight was. The second shot, in the middle, brings in a bounce card to the camera right, again to fill in the shadows. Once again, these changes can be reverse engineered by looking at the specular highlights in the metal top of the mill. Finally after inspecting the shot on the LCD, I decided I wanted to get a bit more definition on the metal top and background, so I moved the light source a bit further away to decrease the light fall-off towards the back of the scene. That added some more light to the background, at the top of the shot which brings the top of the mill out of the darkness. Note that moving the light also reduces the effective size of the light to the subject - so the shadows in the third shot become that bit more defined.
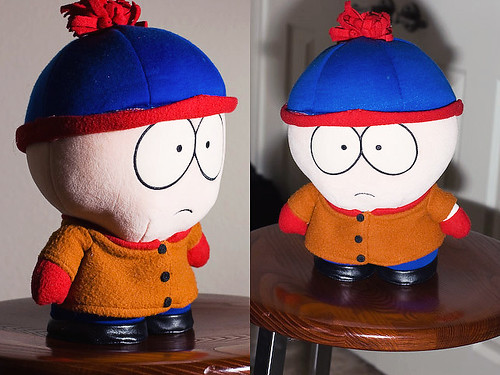
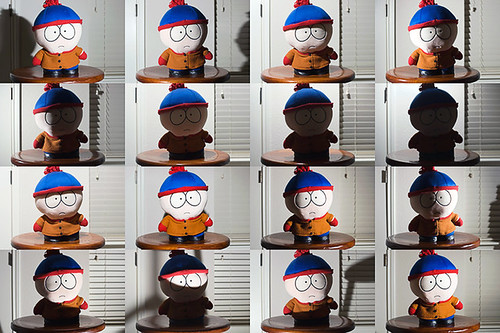
Saturday, August 04, 2007

lighting: apparent size

lighting: apparent size

Okay, let's keep the excitement building for a while with some shots of melons. Or at least one watermelon, multiple times. The principle I'm playing with here is how the apparent size of the light source can dramatically change the shadows. In particular, it changes the transition zone from the highlight to the shadows. Again the camera and subject are fixed and I'm just changing the lightsource. Each time it is just one flash, sometimes zoomed in on a narrow beam and directed straight at the melon (top left). Next I widen the beam with the zoom controls on the flash head (top middle shot) After that I start diffusing it in different ways. The top right shot has the light firing in to a large white ball that acts as a diffuser (and tints the light slightly warmer). For the bottom row, I put the flash head in a silver umbrella. Here I vary how far away the umbrella and flash is from the melon. Bottom left the umbrella is quite far away - so again the shadows are quite well defined, but with a softer fall off as the light is still much larger than just the bare flash head. The bottom middle shot I've moved the umbrella closer in, giving a much more wrap around, even light with very diffused shadows. Finally, I put a gobo (a sheet of paper) in between the umbrella and the melon - everything else is well illuminated but the translucent paper knocks down the amount of light hitting the melon - the background ends up brighter as a result.

Friday, August 03, 2007

Lighting distance

Lighting distance

Well the excitement just keeps on building with another series of shots of Stan. This time though the camera & subject are in a fixed position (about 3 feet apart), with a white wall about another 3 feet behind. The only thing varying here is the light position and power. What this really shows is how the light can fall off, depending on the ratio of the light to subject and light to background distance. With a high ratio the light falls off quickly (such as the first image on the left) The flash is close to Stan and turned down low. He is well illuminated but the light falls off quickly so the background is dark. Moving the light source a bit further away, so that the background is about twice as far from Stan as the light source, leads to the image in the middle. Again the flash power is adjusted so that Stan is well exposed and the background ends up more evenly exposed, showing up around mid grey. For the final shot on the left, I moved the light back another 10 feet or so. The relative distance between light to subject and light to wall become almost the same, so for a proper exposure both Stan and the background wall appear evenly lit. Next up, shots of fruit. Really. Can't you just not contain your excitment ? I'm working quite quickly through the initial Strobist Lighting102 exercises, so I'll be on to hopefully some more interesting things fairly soon. Stay tuned...

Wednesday, August 01, 2007

lighting: point of view

lighting point of view

This is the second part of playing around with the direction of light for the Strobist Lighting102 exercise 1. Nothing particularly dramatic going on here - the first shot has the light at about 45 degrees to the subject, on the camera right. The second shot is taken just over the light. The real lesson here is that once you start looking at the subject from where the light is, you can see what will be lit or not. This might seem straight forward but it is pretty fundamental, particularly when working with strobes that you can't see the light until they trigger. So what you can see from the point of view of the light is what will be lit. Notice in particular in the shot on the left, the side of Stan's face is in shadow and in the second shot, you can't see the side of his face or hat. Using this knowledge, you can set up lights and know exactly where the direct light will fall - just look from the point of view of the light. As Stan would say I've really learned something today.

Lighting position

Lighting position

I've been a bit uninspired with my photography lately. Not working so hard along project lines, just not shooting as much. In about a month I'm going to Savannah for a week long workshop that I'm really looking forward to. I'm hopeful that will launch me off in some new directions. At the same time, Strobist has recently started the Lighting102 class & shoot-along series so I've decided to work through some of those exercises too, just to get my visual muscles flexing and hopefully learn some more lighting techniques. I'm about a month behind on the lesson plan so I'll be trying to catch up over the next few weeks. The series of portraits above of my good friend, Stan, are really simple. All shot on manual exposure, with the flash power output on manual as well. The only thing that varies from frame to frame is the light location. The subject <-> light distance doesn't change (much), the camera settings or position is fixed too. Yet just by moving the light around I can dramatically change the look and feel of the shadows and the overall shot. I'm not doing anything particularly interesting here, but it still demonstrates a large amount more control and opportunity than if the flash was on-camera. Canon 1DII, 50mm 1.4. Nikon SB-28 off-camera